HP Prime for All
English
Русский
Author: Edward Shore (original article)
This section we will start covering some of the graphics features of the HP Prime Programming Language. We touched on graphics a bit when we used STARTAPP and STARTVIEW to call up the Plot screen of certain apps (Function, Parametric, Polar, Advanced Grpahing).
This time we are going to use drawing commands that can be used in any HP Prime app.
In a sense we are creating a graphic object (GROB). The HP Prime allows for ten graphic objects, named G0 - G9.
For this tutorial series, (unless specified) I am always going to use the default GROB, G0.
This makes typing commands much easier.
Each graphic object operates in either one of two coordinate systems: Cartesian and pixel.
If you worked with the Hewlett Packard HP 39gii calculator, this might look familiar to you.
Xmin, Xmax, Ymin, and Ymax.x increasing as we move to the right and y increasing as we move up. (no shocker there).x still increases as we go to the right. However, y increases as we go down, opposite of the Cartesian system. On the other hand, x and y are always non-negative.The HP Prime has two sets of drawing commands: one for the Cartesian system and one for the Pixel system.
All commands for the Pixel system will have a _P suffix attached. For example:
LINE draws a line using Cartesian coordinates, while LINE_P draws a line using Pixel coordinates.
General Access: (in the Programming Editor)
Drawing Commands for the Pixel system:
Drawing Commands for the Cartesian system:
To clear the GROB screen, we will simply type RECT().
The wipes the screen, leaving it white. It is necessary to do this at least at the beginning of each program containing drawing commands.
In a sense, RECT() is similar to PRINT().
Hint: To paint an entire screen a specific color, use RECT(color).
It is not enough to type the drawing commands. We need a command to tell the HP Prime to show the graphics. Two ways to do it are:
FREEZE: This does exactly what it says, freezes the screen.
To exit, tap the screen or press
Pressing
Access:
WAIT(0): This freezes the screen for an indefinite amount of time. However, pressing any button will cause the program to continue. Of course, if the last END is followed by WAIT(0), the program terminates.
Of course, you can use WAIT(n) to make the calculator wait n seconds before executing the next step.
TEXTOUT and TEXTOUT_P inserts text on a graphics object using Cartesian and Pixel coordinates, respectively.
They are also at the bottom of the Cartesian and Pixel Drawing sub menus, respectively.
(Use either the
Syntax (starred commands are optional):
Cartesian:TEXTOUT(text, GROB*, x, y, font size*, text color*, width*, background color*)
Pixel:TEXTOUT_P(text, GROB*, x, y, font size*, text color*, width*, background color*)
text: The text to be written. It can be a string, results, calculations, or any combination.GROB*: Graphic Object G0 through G9 to be used. If left out, G0 is used.x: x coordinatey: y coordinatefont size*: The text font's size code. Must be used if you want text to be a color other than black. Optional. Default is the current size set by Home Settings.text color*: The color of the text. Use of the RGB command is advised. Optional. Default color is black.width*: Length of the background box of the text. Optional. I usually don't use this argument.background color*: Color of the background box. Optional. I usually don't use this argument.Simplified Syntaxes:
Black text at default font size:TEXTOUT(text, x, y)TEXTOUT_P(text, x, y)
Colored text at a set font size:TEXTOUT(text, x, y, size code, color)TEXTOUT_P(text, x, y, size code, color)
With all this, we finally get to some programming.
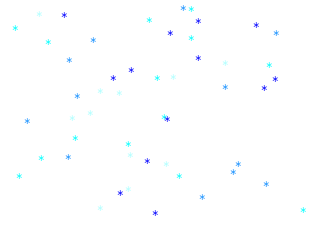
Since it is December, and snowing in a lot of the northern side of Earth, let's use TEXTOUT_P to draw snowflakes.
I am going to use symbolize the snowflake by the asterisk, the symbol of multiplication in programming × types *.
Note: Take note the order of the commands. The order regarding where to draw and generate random numbers is important to get the results you want.
SNOWFLAKE takes one argument, which is the number of snowflakes to be drawn.
Program:
EXPORT SNOWFLAKE(N)
BEGIN LOCAL X, Y, Z, I, L0;
L0 := {RGB(0, 0, 255), RGB(178, 255, 255),
RGB(30, 144, 255), RGB(0, 255, 255)};
// blue, light blue, dodger blue, cyan
RECT();

FOR I FROM 1 TO N DO X := RANDINT(0, 304); // save some room since text takes pixels
Y := RANDINT(0, 208);
Z := RANDINT(1, 4);
Z := L0(Z);
TEXTOUT_P("*", X, Y, 2, Z);
END;

FREEZE;
END;
N = 50
N = 250

N = 500
