HP Prime for All
English
Русский
In this activity, we use the Geometry app to create a quadrilateral. We then create and connect the midpoints of consecutive sides of the quadrilateral to form another quadrilateral and explore the properties of the latter in terms of the former.

4 Polygon > 4 Quadrilateral.

E, based on the four points A, B, C, and D.2 Point > 3 Midpoint . Tap near the midpoint of AB (or tap each of points separately) and press 
O from points K, L, M, and N.KL, LM, MN, and NK as well.

1 Choose Color (or 4 Choose Color) and select any color from color picker. Tap
Tap A Tests, then select
8 Parallelogram . The command is pasted into the command line. Remember that the name of our inner quadrilateral is GO.
Type GO between the parentheses and press 
We are now ready to explore our construction.

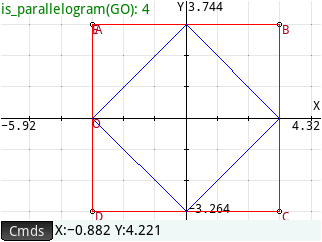
KLMN maintains a value of 1, indicating it is always a parallelogram.
The parallelogram test can return any of 5 values:
0. Not a parallelogram1. A parallelogram only2. A rhombus3. A rectangle4. A square A, B, C, and D exact values.GA, tap and enter new coordinates (-3,3). Tap when you are done.
B, C, and D so that you have A(-3,3), B(3,3), C(3,-3) and D(-3,-3), making ABCD a square.KLMN is a square as well.
It seems that KLMN is always at least a parallelogram, no matter where we move the coordinates of points A, B, C, and D (as long as they are not collinear!). To see why this is so, simply construct the diagonals AC and BD.

3 Line > 1 Segment. Tap on point A and press C and press B and D. Then press KL joins the midpoints of two sides of ΔABC, then it is parallel to the third side AC;
likewise, MN joins the midpoints of two sides of ΔACD, and is thus parallel to AC as well. Thus KL and MN are parallel.
The same can be seen for segments NK and ML.

 With the testing and symbolic abilities of the Geometry app, students can set about the proofs or refutations of conjectures such as
these:
With the testing and symbolic abilities of the Geometry app, students can set about the proofs or refutations of conjectures such as
these:
ABCD is a rhombus, then KLMN is a rectangleABCD is a rectangle, then KLMN is a rhombusABCD is an isosceles trapezoid, then KLMN is a rhombusABCD are perpendicular, then KLMN is a rectangleABCD are congruent, then KLMN is a rhombus